Introduction
Compaction is the application of mechanical energy to a soil to rearrange the particles and reduce the void ratio. Compaction test is principally performed on soil is to reduce the settlement that happens when the soil is subjected to load from the structure above it. Compaction helps in increasing the shear strength of the soil. It reduces the voids ratio making it more difficult for water to flow through soil. This is important if the soil is being used to retain water such as would be required for an earth dam. Compaction can prevent the build up of large water pressures that cause soil to liquefy during earthquakes.
Factors That Affecting Compaction
- Water content of the soil
- The type of soil being compacted
- The amount of load applied during compaction
Laboratory Compaction Tests
This laboratory test is performed to determine the relationship between the moisture content and the dry density of a soil for a specified compactive effort. The compactive effort is the amount of mechanical energy that is applied to the soil mass. Several different methods are used to compact soil in the field, and some examples include tamping, kneading, vibration, and static load compaction. This laboratory will employ the tamping or impact compaction method using the type of equipment and methodology developed by R. R. Proctor in 1933, therefore, the test is also known as the Proctor test.
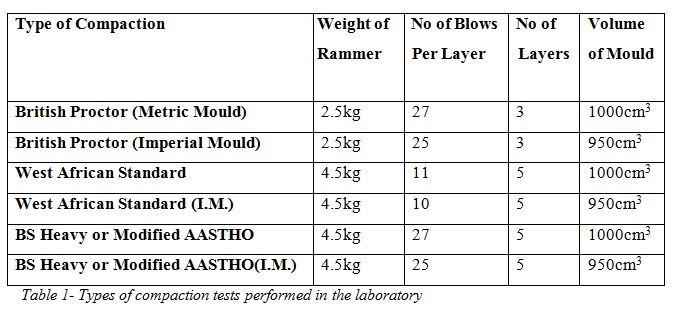
There are several types of method which can be used to study the compactive properties of soils as described below. Because of the importance of compaction in most earth works standard procedures have been developed. These generally involve compacting soil into a mould at various moisture contents. They are described as shown below:
1. British Proctor (Metric Mould)
In this test, soil is compacted into a mould of 1000cm3 volume in 3equal layers, each layer receiving 27 blows (hitting of the soil) of a hammer of 2.5kg weight.
2. British Proctor (Imperial Mould)
In this test, soil is compacted into a mould of 950cm3 volume in 3equal layers, each layer receiving 25 blows of a hammer of 2.5kg weight.
3. West African Standard
In this test, soil is compacted into a mould of 1000cm3 volume in 5equal layers, each layer receiving 11 blows of a hammer of 4.5kg weight.
4. West African Standard (Imperial Mould)
In this test, soil is compacted into a mould of 950cm3 volume in 5equal layers, each layer receiving 10 blows of a hammer of 4.5kg weight.
5. BS Heavy or Modified AASHTO
In this test, soil is compacted into a mould of 1000cm3 volume in 5equal layers, each layer receiving 27 blows of a hammer of 4.5kg weight.
6. BS Heavy or Modified AASHTO (Imperial Mould)
In this test, soil is compacted into a mould of 950cm3 volume in 5equal layers, each layer receiving 25 blows of a hammer of 4.5kg weight.
Objective(s) of the Experiment
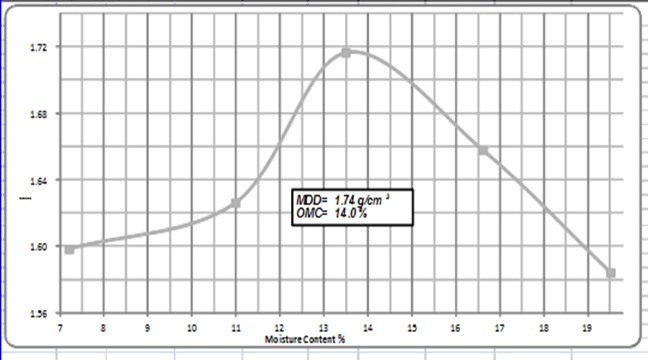
The test is carried out to derive a relationship between the moisture content of a soil and its dry density, from which the optimum moisture content and the maximum dry density are then determined.
Equipments and Materials Needed
- Soil Sample
- Cylindrical metal moulds
- Manual Rammer
- Weighing Balance
- Graduated cylinder
- Straight edge metal
- Mechanical Mixer
- Drying oven
- Moisture can
- Sieve and Trowel
Procedures
The test is carried out many times using the same soil sample but varying the amount of water added. Water is added to the soil sample as a percentage of its weight. The test is first carried out on the natural moisture (N/M) of the soil (that is without adding water). Subsequently, the test is carried out using the 2%, 4%, 6%, 8%, 10%, etc of the weight of the soil sample as the mass of water added. For example, if the mass of the soil sample is 6000g, then for 2% moisture content, 120g of water is added. The following steps are followed:
- Weigh the empty mould + base = m1 (g)
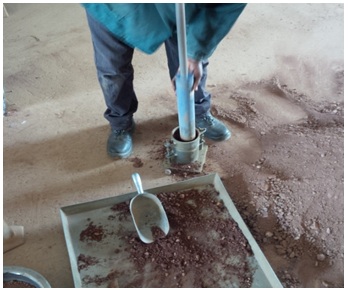
- Pour and compact the soil sample using the suitable method of the ones discussed above. The soil should completely fill the cylinder and the last compacted layer must extend slightly above the collar joint. If the soil is below the collar joint at the completion of the drops, the test point must be repeated. (Note: For the last layer, watch carefully, and add more soil after about 10 drops if it appears that the soil will be compacted below the collar joint).
- When the final(top) layer is rammered properly, use the straight edge equipment to level its top and weigh the compacted soil + mould + base = m2 (g)
- For each water increment, take a small sample, weigh it and put the sample in the oven for 24hours. Weigh the dried sample. Make sure that the weight of moisture cans are measured and recorded in a compaction sheet.
Results and Calculations
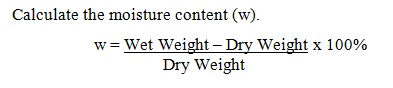
First, calculate the moisture content using the small sample that was put in the oven.

Where 1000cm3 is the volume of the mold (or use a value as appropriate).
To calculate the Dry Density,
- Let Wet Weight = Wb = Weight of Mold & Soil – Weight of Soil (m2-m1) (g)
- Let moisture content = w (%)
Dry Weight = Wd = Wb — Wb*w/100
Dry Density = Wd/Volume of Mold
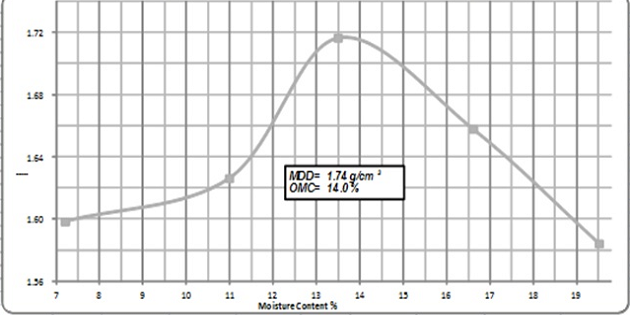
Plot the graph of Dry Density against Moisture content, considering all the water quantities used during the test. An example of the graph is as shown in the figure below.
Discussion and Conclusion
Effects of water content during compaction
As water is added to a soil (at low moisture content) it becomes easier for the particles to move past one another during the application of the compacting forces. As the soil compacts the voids are reduced and this causes the dry unit weight (or dry density) to increase. Initially, as the moisture content increases so does the dry unit weight. However, the increase cannot occur indefinitely because the soil state approaches the zero air voids line which gives the maximum dry unit weight for a given moisture content. Thus as the state approaches the no air voids line further moisture content increases must result in a reduction in dry unit weight. As the state approaches the no air voids line a maximum dry unit weight is reached and the moisture content at this maximum is called the optimum moisture content.
Effects of increasing compactive effort
Increased compactive effort enables greater dry unit weights to be achieved which because of the shape of the no air voids line must occur at lower optimum moisture contents. It should be noted that for moisture contents greater than the optimum the use of heavier compaction machinery will have only a small effect on increasing dry unit weights. For this reason it is important to have good control over moisture content during compaction of soil layer in the field.
References
- Das, B. M. (2006). Principles of Geotechnical Engineering, 7th ed. Cengage Learning, Stamford.
- www.wikipedia.com
Download “Compaction Test on Soil”
Compaction-Test.docx – Downloaded 0 times – 496.10 KB Density Test")


